Lambda functions are great for automating tasks on AWS, like stopping and starting systems. I had some trouble scheduling my amazon database (RDS) to turn off and on, whilst Amazon provide a rather succinct guide describing the scheduled stopping and starting of ec2 instances, I couldn’t find an equivalent RDS guide.
I did however manage to find an excellent guide here, which much of this post is based upon. However AWS has since upgraded their platform, the process to schedule RDS instances has upgraded along with it. So I present the guide I wish I could have had.
I’m going to light-up the server twice a day for ten minutes, when it will talk with an ec2 instance. This is all I need it for right now, I do not wish to otherwise pay for this infrastructure to be always on.
Prerequisites
This guide assumes you have already set up your RDS database, you wouldn’t have read this far down if you hadn’t.
Otherwise, nothing else is needed. This won’t take long.
Create role
In the Services screen, select IAM, it is located under Security, Identity & Compliance.
- Select Roles on the left
- Then select Create Role button
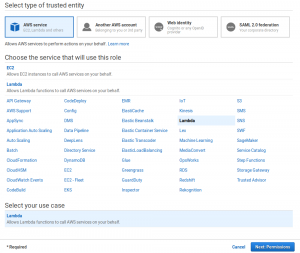
- And click on Lambda under Select your use case and click Next: Permission

After selecting Lambda, the use case box appears. Select this and click next - Select AmazonRDSFullAccess and select Next: Review
- Give it a sensible name and description and select the Create Role button.
Create Lambda Function
Now that we have a role, we can create a Lambda function. Here we defer to the aforementioned guide since much of this part remains unchanged.
Lambda Code
The code we will use in our Lambda function is provided generously on GitHub. This will later be uploaded to the Lambda function designer.
To be accepted by Lambda, I found I had to extract this Zip and re-zip the individual files, removing the redundant folder structure.
Build Lambda
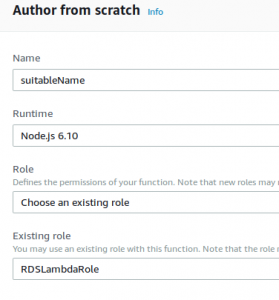
Under Services select Lambda > Create Function. Give your function a suitable name and under Runtime select Node.js 6.10. We will use the role we just created.
On the next screen there are a number of sections, we are only interested in Function Code and Execution role.
Under Function Code select the Code entry type drop down and select Upload a .ZIP file. Select and upload the (re-zipped) files from GitHub. Then select save.
Under Execution role select the existing role we created above.
Test code
If you want to test the code, select the Test from the top of the page and select configure test events. You can use some like the code below to test your Lambda, using appropriate RDS instance ID names, and “stop” can be replaced with “start” to activate or deactivate the RDS instance respectively. You can run the test and then check that the RDS instance is magically stopping or starting.
{ "instances": [ "myRDSInstanceName" ], "action": "start" } |
Something that confused me coming from the the ec2 instance scheduling was the equivalent instance id, for RDS you just need to use the regular name.
Create CloudWatch rule
We bring everything together here. In the services screen, select Cloudwatch, it is located under Management Tools. Select Rules > Create Rule.
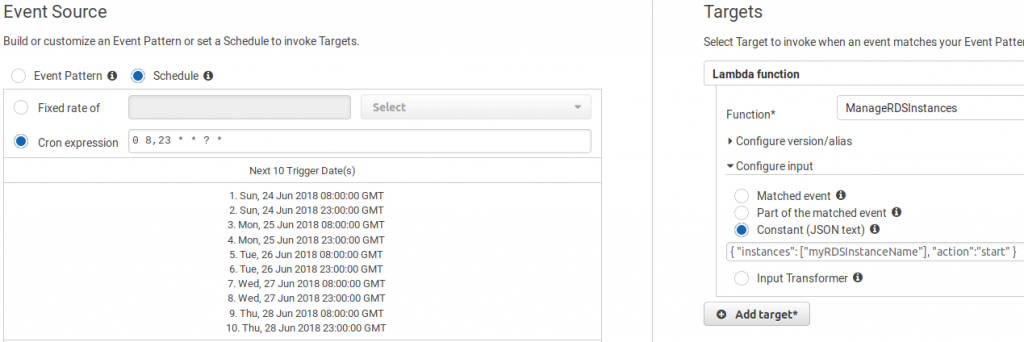
We are going to use a cron expression to schedule the server to activate itself at 8 o’clock in the morning, and again at 11 o’clock in the evening. In both cases, the server will be available for 10 minutes, at which point another Lambda function will shutdown the server. Note that it takes several minutes to start and stop these type of instances.
-
- Select “schedule” > “cron expression”
- Enter a cron expression that describes the schedule, I’m using “0 8,23 * * ? *”
- Under Targets select Lambda Function that we created above.
- Under Configure Input select Constant (JSON text). This is where we can pass parameters to our Lambda function, such as stop and start. The code below will start an instance.
{ "instances": ["myRDSInstanceName"], "action":"start" }
- For the function dropdown, select the Lambda function we created above; ManageRDSinstance. Below is a screenshot of the settings

- Select the Configure Details button.
- On the next screen give an appropriate name and description, and click create rule.
That’s it, I hope this helps someone.
